Above the Main Form you will find the Menu Bar and the Toolbar.
Below the Main Form you will find the Action Bar.
Note that by right mouse clicking on the line items area of the Main Form (ie. the large area encompassing the lower half of the Main Form) you will see options for editing, deleting and inserting rows, as well as changing the display format.
Setting a new display format will allow you to see different columns, such as Technician names and Due By dates.
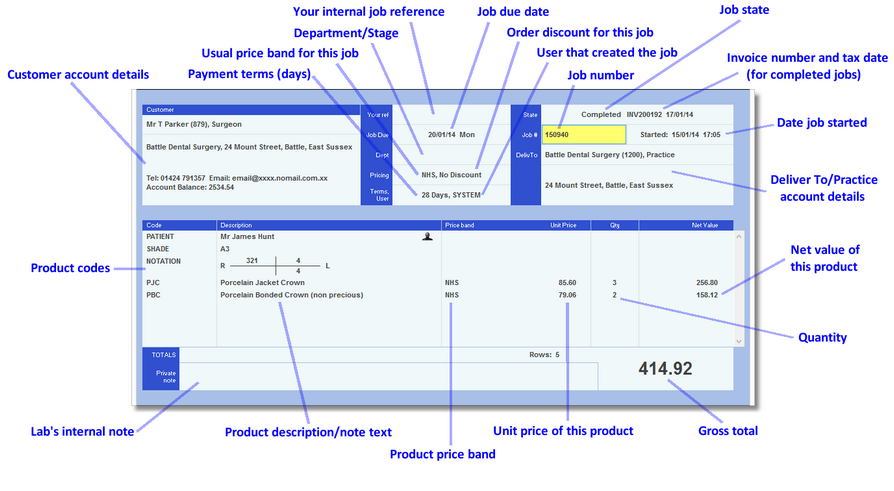
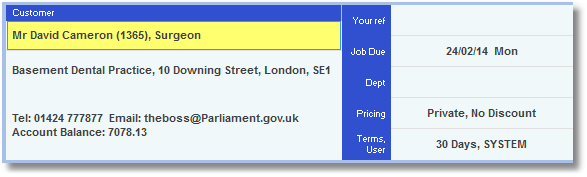
Customer - "Customer account details"
The customer account the current job will be invoiced to. This will often be a dentist account.
You can search for a customer account from this box by typing the account number or part of the customer's name in the box, then pressing Return on your keyboard.
You can also search for a customer using the Customer menu > Select or Add New.
Note that jobs already booked in or out (ie. ongoing or completed jobs) will include the following details as they were at the time of booking in/out: Customer's name, address, Deliver To, early payment rate and terms
If you wish to change these details on a completed job, you will need to Void the invoice, edit the job, edit the customer and save the details, then book the job out again.
If you wish to change these details on a booked in or ongoing job, you will not need to void the invoice, but will need to edit the job and customer details as described above.
By default, the information shown in this box includes:
| • | The customer's name followed by the account number in brackets. The customer type follows this. |
| • | The customer's address. This is taken from the "Customer address" box of the customer details and can be different to the Deliver to/Practice address. |
| • | The customer's primary telephone number and primary email address |
| • | The customer's early payment discount rate (%) and terms (days), if applicable |
| • | The customer's account balance. Note, this information will only be shown if enabled. You can enable this by right-clicking on the customer details and setting the display format from the menu that pops up. |
| • | The Note associated with the customer on the customer details |
To edit the Customer details, you can either:
| • | Click on the Customer box when your mouse pointer is a pointing hand |
| • | Choose Edit from the Customer menu |
| • | Press Return on your keyboard when the customer name is highlighted, as shown in the screenshot below: |
Read more about editing or viewing Customer details here
Your ref - "Your internal job reference"
Your own internal lab reference for this job, if any. You may find it easiest to just refer to the job by its job number, as this will be unique in your Transactor database, but if you have any additional reference you wish to use you can enter it in this box.
The date on which this job is due to be completed. When you create a job, the due date is automatically calculated for you based on the current date and the number of turnaround days that has been set on on the New Jobs page of the Control Centre.
You can change the default number of turnaround days from the New Jobs page.
You can change the job due date of the current job at any time by double clicking on the Job Due box, or by moving the highlight to it and pressing Return.
The department that is currently working on this job, or the stage it is currently at. You can create any number of depts/stages that you wish but a job can only be linked to one dept/stage at any one time.
Examples of depts/stages are "Wax-up", "Try-In", "On-Going".
You can create new depts/stages or modify the names of existing ones in the Depts / Stages page of the Control Centre.
If you wish to change the Dept/Stage of a job, the job will need to be in edit mode. Double click the Dept/Stage box, or press Return when it is highlighted. Remember to book the job back in/out/on hold again afterwards if this is not a new job.
To change the Dept/Stage of a completed job you will first need to void the invoice before performing the above steps.
Pricing - "Usual price band for this job"
The default price band for products added to this job. When you add a new product to this job, this price band (and therefore, the related price) will be used by default, although you can subsequently change this on the Job Item Add to Form screen.
This usual price band is determined by the Usual Prices of the customer associated with this job, or you can set the usual prices for just this job by double clicking on this box, or pressing Return with it highlighted. Doing this will take you to the Job Pricing / Discount popup.
Pricing - "Order discount for this job"
The percentage amount of discount that will apply to this job, as determined by the Order Discount % of the customer associated with this job.
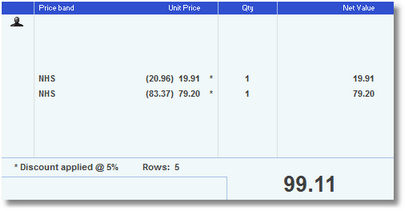
Any products that are eligible for discount will be discounted appropriately and the gross total will reflect this.
Eligible products are those that have been marked as Discountable on the product details. A product must be using a price band price in order to be discountable. Custom prices cannot be discountable.
Any products that have discount applied will show a unit price as per the screenshot below: (original price) discounted price *
You can set the order discount for just this job by clicking on this box, or pressing Return with it highlighted. Doing this will take you to the Job Pricing / Discount popup.
Terms - "Payment terms (days)"
The number of days the customer will have to settle this invoice, as determined by the Payment Terms (days) on the customer's details.
You can alter this figure for this job only by double-clicking on the box, or pressing Return with it highlighted. Doing this will take you to the Job Payment Terms popup.
User - "User that created the job"
The user name of the user that originally created this job in the Transactor database.
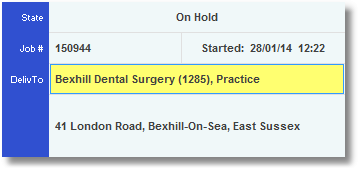
The current state of this job. Such as "Completed", "Booked In", "On Hold", "Edit". Use the Action menu, Action bar or shortcut keys to change the state of a job assuming the change you wish to make is appropriate.
State - "Invoice number and tax date"
Completed jobs will generate a separate invoice number which will uniquely identify the invoice. This is to ensure any invoice generated from a job cannot be confused with previous or subsequent invoices created from the same job, such as if a price needed to be altered or a product added. Only the most recent invoice generated for a job is the "live" invoice, and this is the invoice number shown here.
All invoice numbers begin with the "INV" prefix. The tax date of the invoice is shown beside this.
You can search for jobs by their invoice number by typing the full INV number (for example, INV10202) in the Job # box and pressing Return.
Credit notes do not have a job number but have a "CRD" number and behave in the same way as invoices in that their CRD number and tax date will appear in this box when you are viewing a credit note.
You can search for existing credit notes by typing the full CRD number (for example, CRD10303) in the Job # box and pressing Return.
Invoice numbers are generated by using the next available number from the "Next invoice number" setting in Control Centre > Other Settings.
The job number for the order you are currently viewing. This may also be referred to as the Order Number or Document Number.
If you start a new job using the Action menu, Action Bar or keyboard shortcut the job will automatically be given the next available number from the "Next new job number" setting in Control Centre > New Jobs.
If you wish to start a new job using a number that you specify, you will need to type the job number you wish to use into this box and press Return. If no job already exists with the number you specified, you will be prompted to confirm you wish to start a new job with the number.
The date on which the job was originally entered into the Transactor database as a new job.
DelivTo - "Deliver To/Practice account details"
The delivery address for this job. If the Customer of this job is a dentist, the DelivTo is usually a practice but can be any customer type, or blank. However we recommend that if your Invoicee is a Dental dentist then ensure you choose or enter a new Practice here because a lot of the reports and other functionality depend on this. So even if the Dental dentist is working from and being invoiced at the same address then still associate them with a Deliver To in the customer details window.
You can search for a DeliverTo account from this box by typing the account number or part of the customer's name in the box, then pressing Return on your keyboard.
You can also search for a DeliverTo account using the DeliverTo menu > Select or Add New.
Note that jobs already booked in or out (ie. ongoing or completed jobs) will include the following details as they were at the time of booking in/out: Customer's name, address, Deliver To, early payment rate and terms
If you wish to change these details on a completed job, you will need to Void the invoice, edit the job, edit the customer and save the details, then book the job out again.
If you wish to change these details on a booked in or ongoing job, you will not need to void the invoice, but will need to edit the job and customer details as described above.
The information shown in this box includes:
| • | The DeliverTo account's name followed by the account number in brackets. The customer type follows this. |
| • | The DeliverTo account's address. This is taken from the "Deliver to/Practice" box of the customer details and can be different to the customer's address details. |
To edit the DeliverTo account details, you can either:
| • | Click on the DelivTo box when your mouse pointer is a pointing hand |
| • | Choose Edit from the DeliverTo menu |
| • | Press Return on your keyboard when the DelivTo name is highlighted, as shown in the screenshot below. If you cannot highlight the DelivTo box by pressing Tab then you may need to remove the "Skip Next Tab Position - DeliverTo" option in your user preferences: |
Read more about editing or viewing DelivTo details here
The product codes for the financial and non-financial (ie. notes) items that have been added to this job.
When you start a new job, some products may be added by default, as defined in the New Jobs page of the Control Centre.
If a job is in Edit Mode:
You can add products or notes to the job either by typing the product code in the Code column and pressing Return, or double clicking on the products area of the Main Form. You will be taken to the Product selector.
Also see the notes on entering products using Speed Entry to make this process quicker.
You can edit an item that has already been added to a job by selecting it and pressing Return or Spacebar, or by double-clicking on it, or by using the Product menu > Edit row. You will be taken to the Edit Job Item window.
You can delete an item by highlighting it then pressing the Delete key on your keyboard, or by right-clicking the item and selecting Delete row, or by using the Product menu > Delete row.
You can insert an empty line between items by highlighting the product you wish to move down, then pressing the Insert key on your keyboard, or by right-clicking the item and selecting Insert row, or by using the Product menu > Insert row.
You can right-click on this area of the main form and choose "Set display format" to show or remove additional columns.
Also see Product Coding and Price Bands
Description - "Product description/note text"
The product descriptions for financial products, or the text of note products (such as for PATIENT or SHADE) that have been added to this job.
You can configure an icon to show on the right side of this area for your products. Some products already have an icon set, such as PATIENT.
When you start a new job, some products may be added by default, as defined in the New Jobs page of the Control Centre.
If a job is in Edit Mode:
You can add products or notes to the job either by typing the product code in the Code column and pressing Return, or double clicking on the products area of the Main Form. You will be taken to the Product selector.
Also see the notes on entering products using Speed Entry to make this process quicker.
You can edit an item that has already been added to a job by selecting it and pressing Return or Spacebar, or by double-clicking on it, or by using the Product menu > Edit row. You will be taken to the Edit Job Item window.
You can delete an item by highlighting it then pressing the Delete key on your keyboard, or by right-clicking the item and selecting Delete row, or by using the Product menu > Delete row.
You can insert an empty line between items by highlighting the product you wish to move down, then pressing the Insert key on your keyboard, or by right-clicking the item and selecting Insert row, or by using the Product menu > Insert row.
You can right-click on this area of the main form and choose "Set display format" to show or remove additional columns.
Price band - "Product price band"
The price band used for the product on this row. If no price band is showing here then a custom price was entered by the user when adding or modifying this product row.
This is set when you add the product to the job although you can also alter this on a job in Edit Mode, by editing the row by highlighting it and pressing Return or Spacebar, or by double-clicking on it, or by using the Product menu > Edit row. You will be taken to the Edit Job Item window.
Also see Product Coding and Price Bands
Unit Price - "Unit price of this product"
The price for a single item of this product, as determined by the Price Band, or the custom price entered by the user. This price is multiplied by the Qty to give the Net Value of this row.
You can modify the prices of this product (as opposed to just the product row on this job) by editing the product from the Product Selector, or through the Products page of the Control Centre.
The price and price band associated with this product row is set when you add the product to the job although you can also alter this on a job in Edit Mode, by editing the row by highlighting it and pressing Return or Spacebar, or by double-clicking on it, or by using the Product menu > Edit row. You will be taken to the Edit Job Item window.
If a discount has been applied to this product, the original (undiscounted) price is shown in brackets, followed by the discounted price and a star " * ".
Also see Product Coding and Price Bands
The quantity of this product on this job. This amount is multiplied by the Unit Price to give the Net Value of this row.
The quantity of this product is set when you add the product to the job although you can also alter this on a job in Edit Mode, by editing the row by highlighting it and pressing Return or Spacebar, or by double-clicking on it, or by using the Product menu > Edit row. You will be taken to the Edit Job Item window.
See the notes on entering products using Speed Entry to make adding a product and quantity quicker.
Net Value - "Net value of this product"
The net value of the product on this job. This amount is derived from the Unit Price multiplied by the Qty of this row.
Tec - "Technician/Team"
The name of the technician or team that is working on this item.
If you do not see this column you can display it by right-mouse-clicking on the line items area, then choosing "Set display format", then choose a format that includes the "Tec" column.
Due by
The date this item is due to be completed by.
If you do not see this column you can display it by right-mouse-clicking on the line items area, then choosing "Set display format", then choose a format that includes the "Due by" column.
Done
Yes or No. Has this item been completed yet?
If you do not see this column you can display it by right-mouse-clicking on the line items area, then choosing "Set display format", then choose a format that includes the "Done" column.
The total amount to be invoiced by this job, including tax where appropriate. You can specify tax rates on products themselves by setting their Usual Tax on the Edit Product window.
Private note - "Lab's internal note"
You can add a note to this job by highlighting it and pressing Return, or by double-clicking on this box with the mouse.
This note will not be printed on any documents or reports that you would normally send to the customer.